Documentation · Smart Chatbot
Smart Chatbot Documentation
How to install, connect, train and configure the Team JUH Smart Chatbot WordPress plugin. Every feature is free, with no licence key and no limits.
Last updated: 19 November 2026 · AI Chatbot Privacy Policy
1. What this plugin does
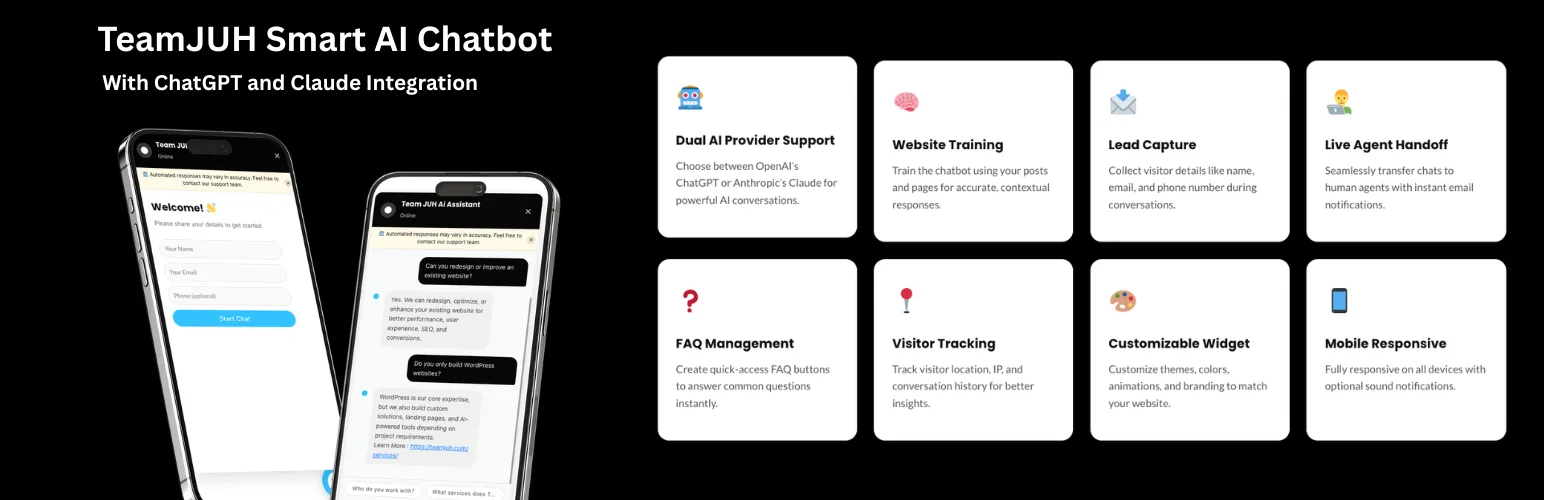
TeamJUH Smart Chatbot with ChatGPT and Claude adds an AI chat widget to a WordPress site. It answers from your own posts and pages rather than from general knowledge, collects name, email and phone when you want it to, and hands the conversation to a person when the visitor asks for one.
Everything in this guide is free. There is no paid tier, no licence key and no feature held back: every AI model your provider account can reach, unlimited FAQ buttons, unlimited conversation history and unlimited live chats are in the plugin everyone downloads.
Some admin screens still carry the AI Chat Pro name from when there were two versions. It is the same plugin.
This page documents version 1.2.3. The plugin is published on WordPress.org.
2. Requirements
- WordPress 5.8 or higher.
- PHP 7.4 or higher.
- An API key from OpenAI or Anthropic. The plugin does not include one and does not resell credits.
- HTTPS is recommended, so that keys and conversations are not sent in the clear.
3. Install and activate
From the WordPress dashboard: go to Plugins > Add New, search for "TeamJUH Smart Chatbot", click Install Now, then Activate.
Manual upload: download the ZIP from the plugin page, then go to Plugins > Add New > Upload Plugin, choose the file, install and activate.
A new AI Chat menu appears in the admin sidebar once the plugin is active. Everything in this guide lives under it: the dashboard, Live Chat, Conversations, Manage FAQs and Settings.
4. The dashboard at a glance
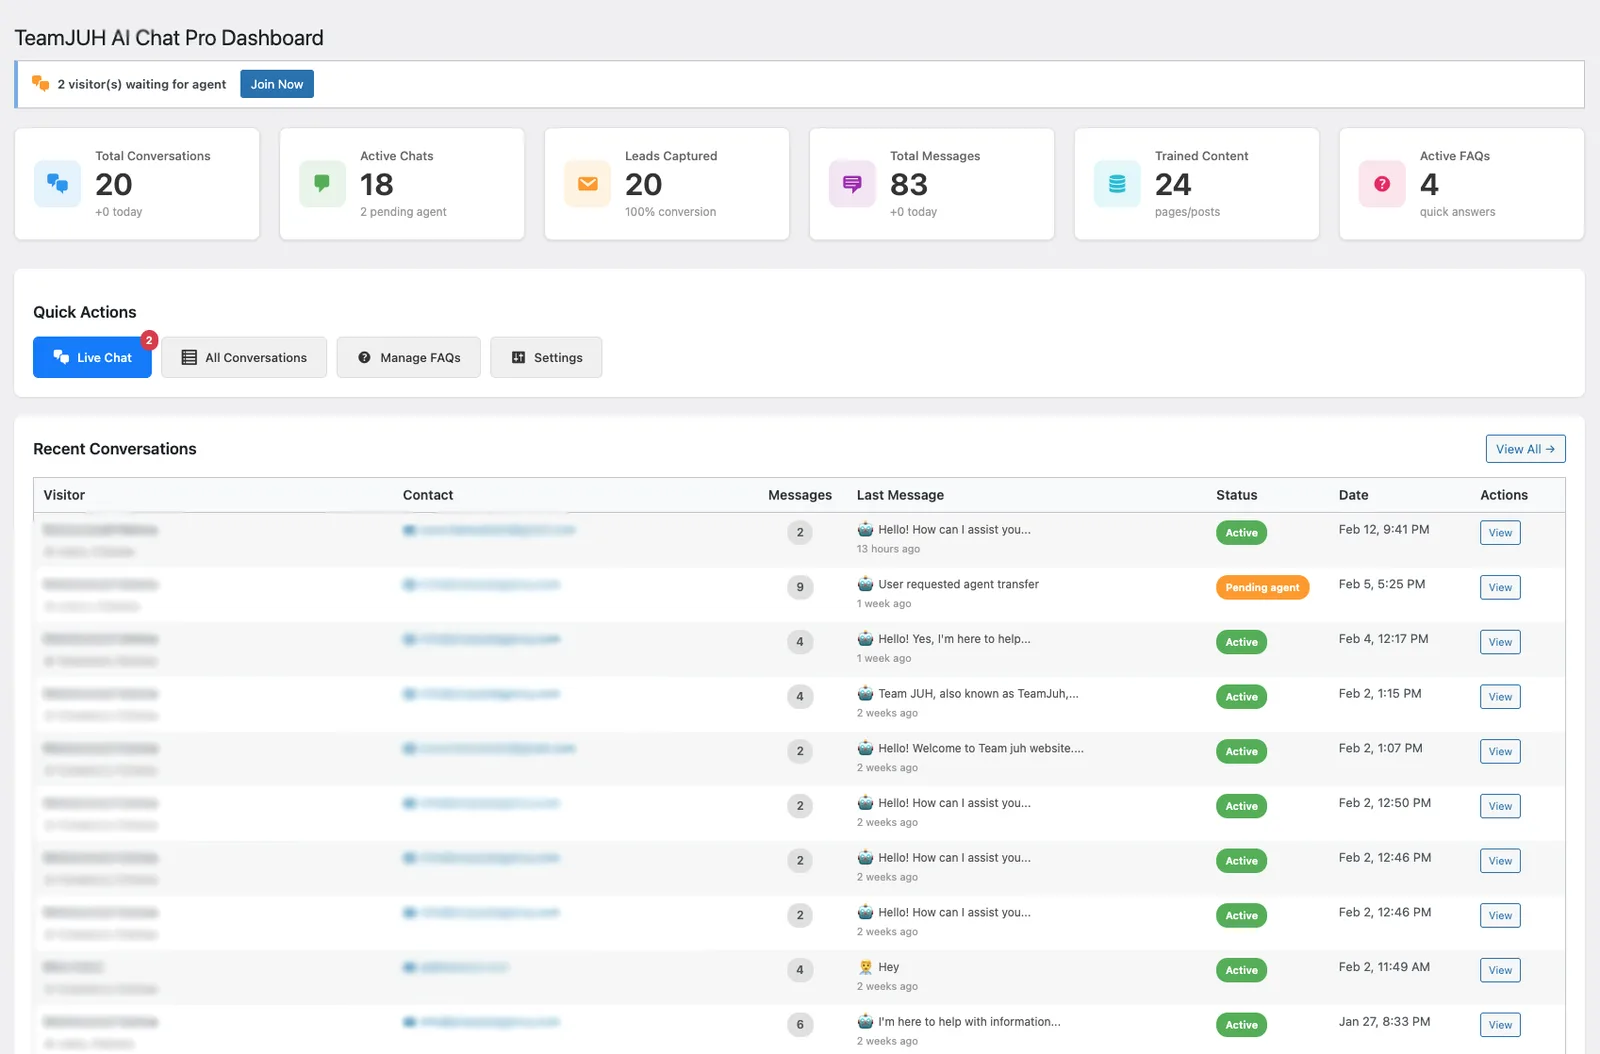
The dashboard is the first screen under AI Chat. Across the top it counts total conversations, active chats, leads captured, total messages, trained pages and active FAQs. Below that, Quick Actions jump straight to Live Chat, All Conversations, Manage FAQs and Settings, and a list shows recent conversations with their status.
When somebody is waiting to speak to a person, a banner appears at the top with a Join Now button, and the Live Chat action carries a count badge. That banner is the one thing on this screen worth checking daily.
5. Connect an AI provider
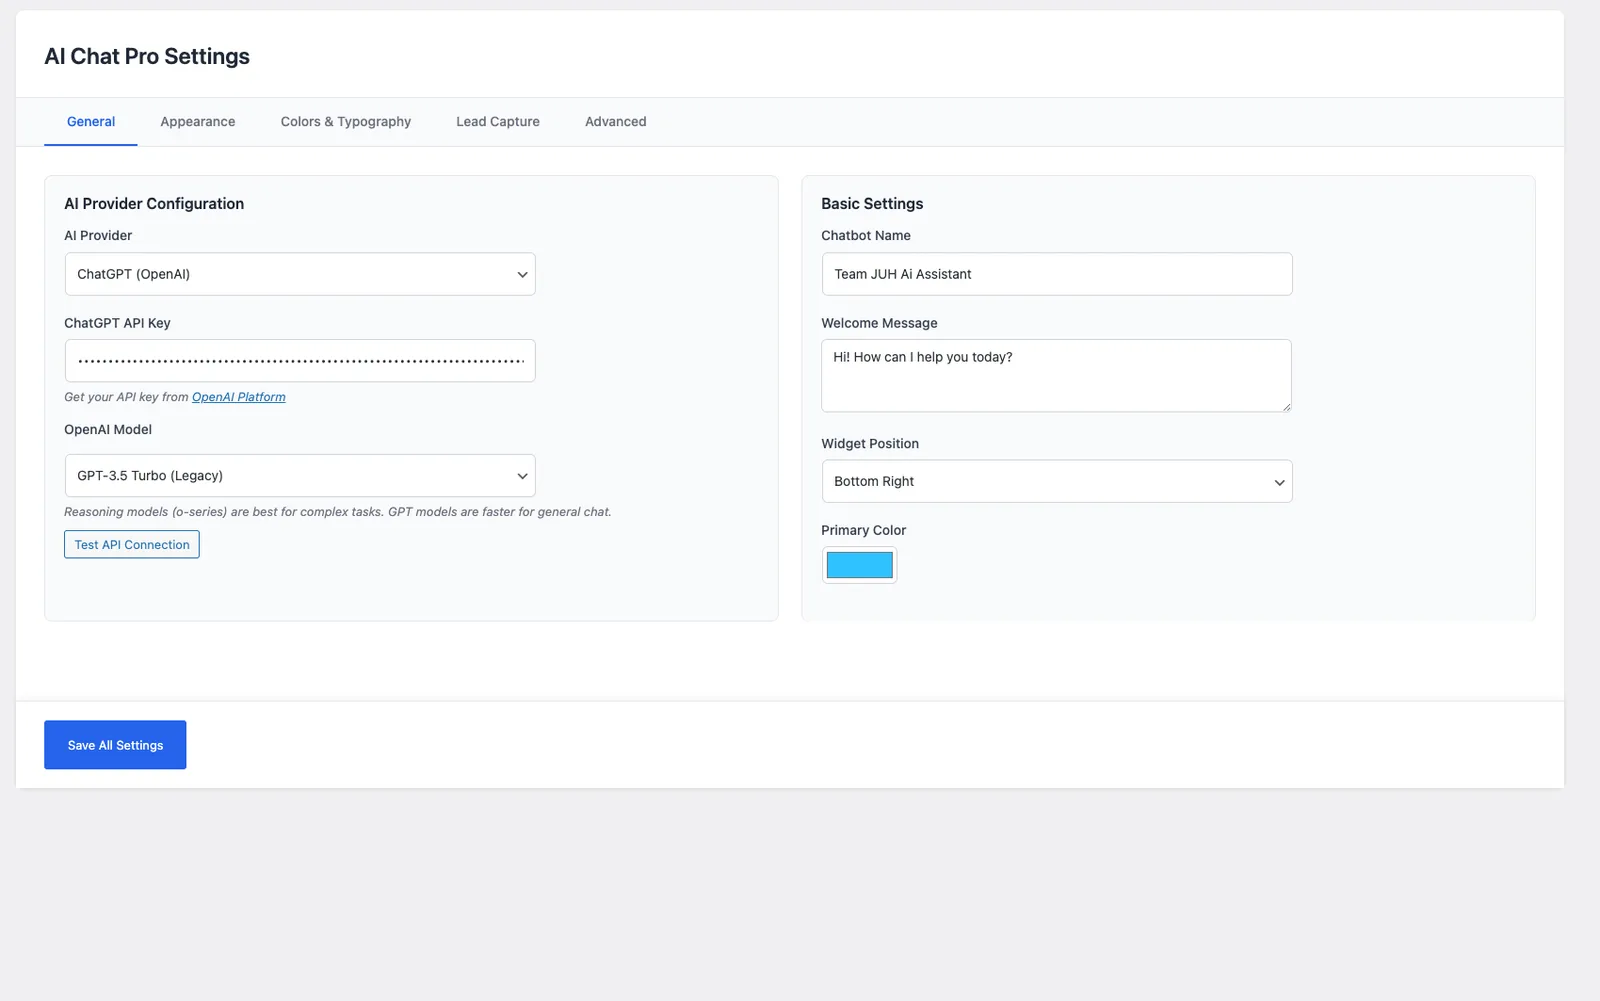
Go to AI Chat > Settings > General. Under AI Provider Configuration, choose ChatGPT (OpenAI) or Claude (Anthropic), paste the API key from that provider's dashboard, and pick a model.
- Test API Connection confirms the key works before any visitor sees the widget. Run it after every key change.
- Refresh Models pulls the current model list for your key, so newly released models appear without a plugin update. If a model you expect is missing, your account does not have access to it yet.
Basic Settings, on the same tab, sets the chatbot name, the welcome message the visitor sees first, the widget position and the primary colour.
You are billed by OpenAI or Anthropic for usage, not by us. Smaller models such as GPT-4o Mini or Claude Haiku cost a fraction of the large ones and are usually enough for answering questions about a website. Start there and move up only if answers are weak.
6. Train the chatbot on your content
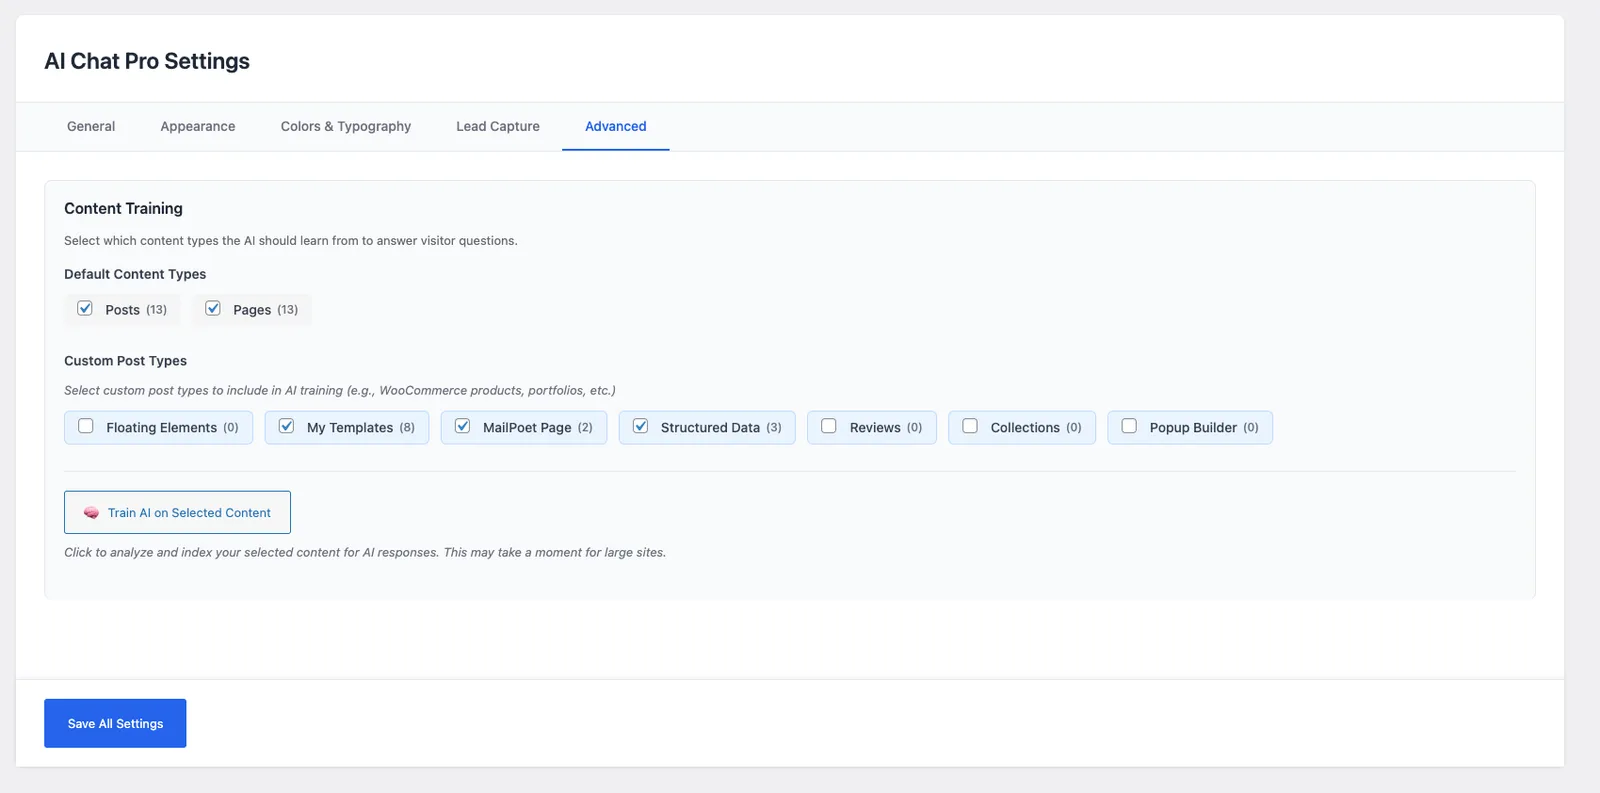
Content training lives under AI Chat > Settings > Advanced. Tick the content the chatbot is allowed to answer from, then click Train AI on Selected Content. Posts and pages are offered by default, with a count beside each, and any custom post types your site registers appear below them, which is where WooCommerce products, portfolios and similar live.
Training takes a moment on a large site. Run it again after you publish or substantially rewrite anything the chatbot should know about.
Train on fewer, better pages. Services, pricing, policies, shipping and contact details answer most real questions. Including every template or layout post type makes answers vaguer, not smarter.
After training, ask it something you know is not covered anywhere on the site. It should say it does not know rather than invent an answer. If it invents one, narrow the selection and train again.
7. Appearance: theme, avatar and sound
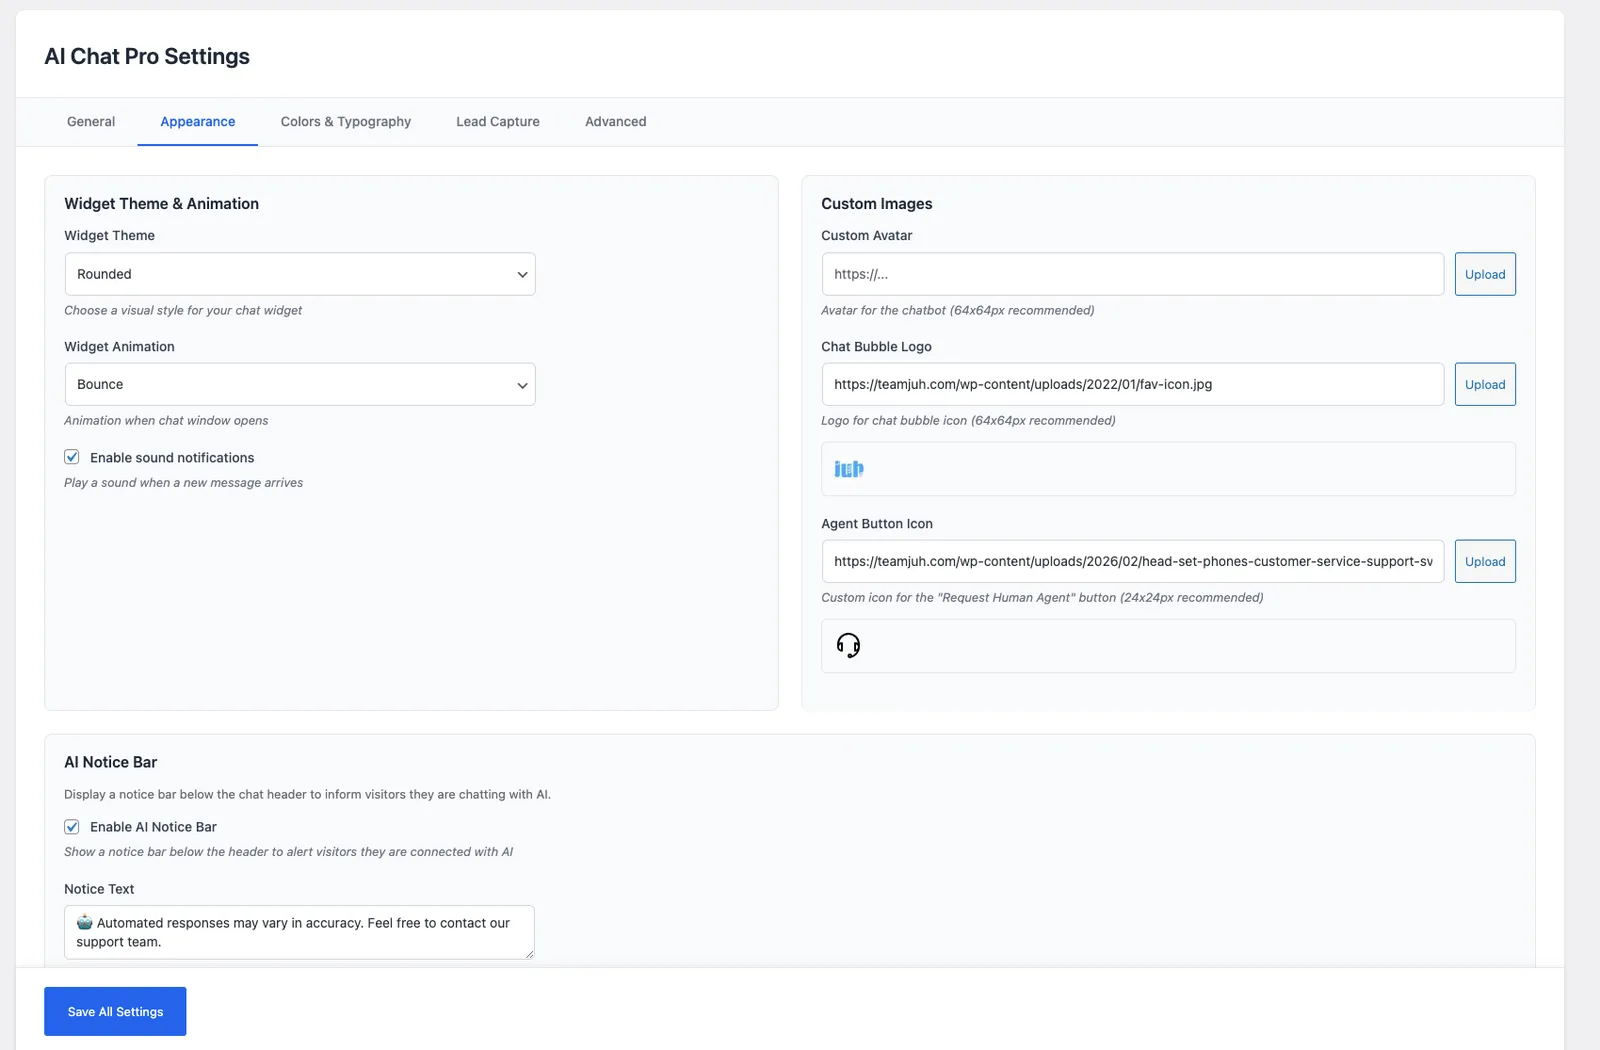
AI Chat > Settings > Appearance controls the widget theme, the animation the chat window opens with, and whether a sound plays when a message arrives.
Custom Images on the same tab takes three URLs, each with an upload button: the chatbot avatar and the chat bubble logo at 64x64px, and the icon on the request-an-agent button at 24x24px. Each one previews underneath once set.
Test on a phone before launch. A chat bubble that covers a sticky call button or a cookie banner is the most common layout problem, and it only shows up at small widths.
8. Colours and typography
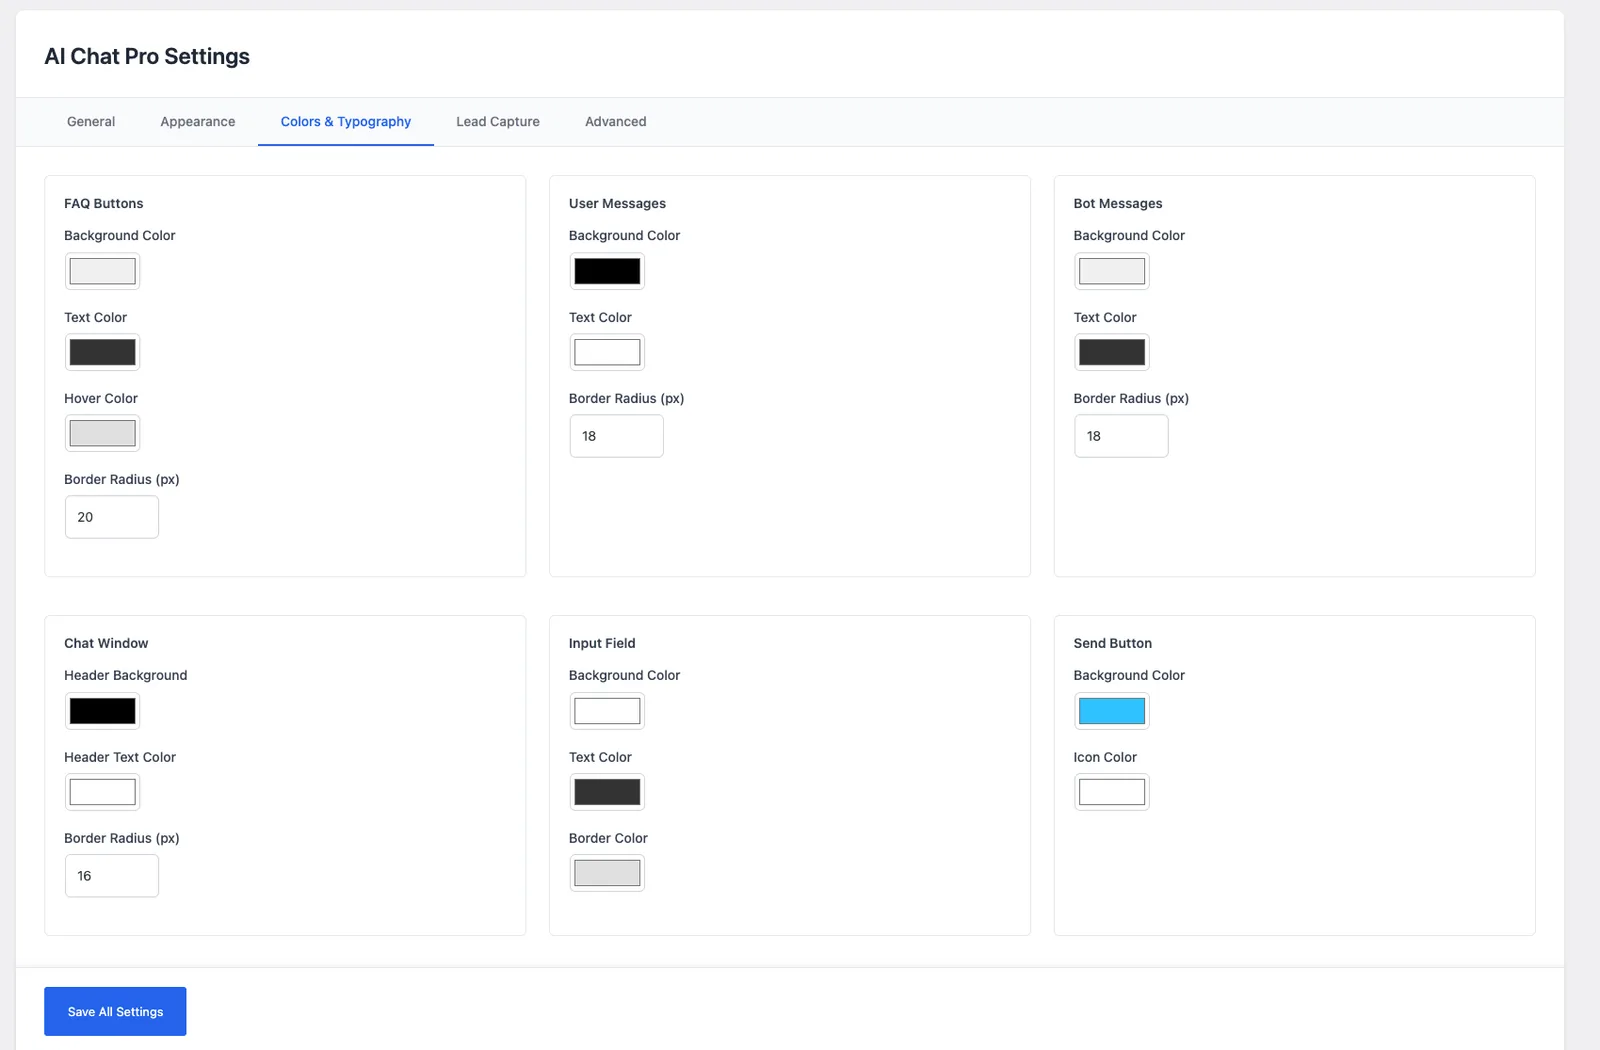
AI Chat > Settings > Colors & Typography styles each part of the widget separately: FAQ buttons, the visitor's messages, the bot's messages, the chat window header, the input field and the send button. Most take a background, a text colour and a corner radius in pixels.
Two colours do most of the work: the header background and the visitor message background. Set those to your brand and leave the rest, rather than tuning all six panels at once.
9. FAQ quick buttons
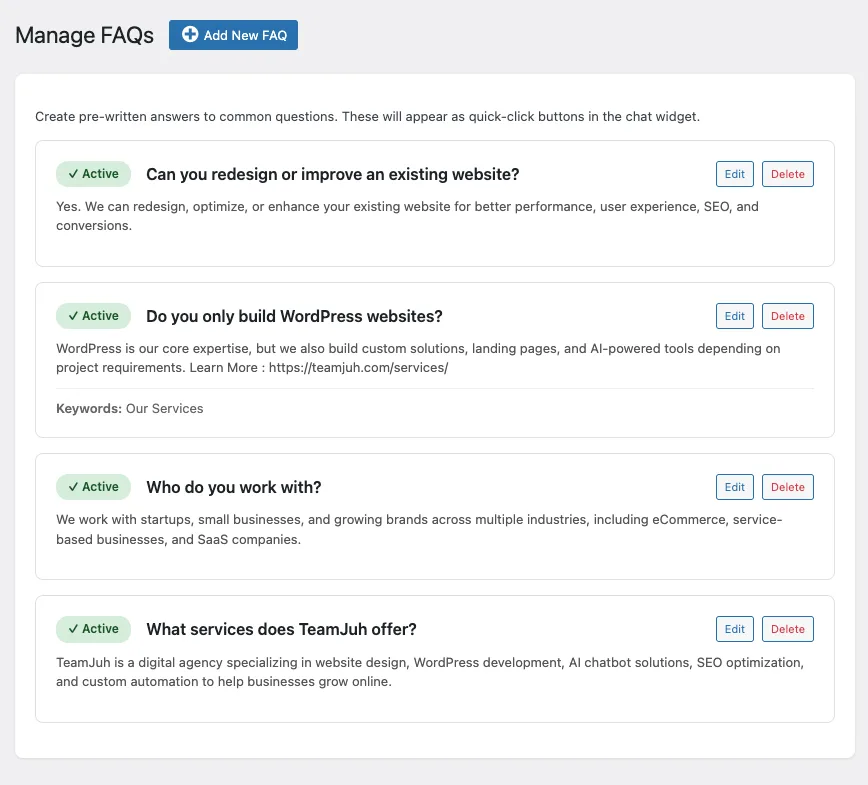
AI Chat > Manage FAQs holds pre-written answers that appear as quick-click buttons when the chat opens. Add New FAQ creates one, each can be active or inactive, and an optional keywords field helps the chatbot match a typed question to the right answer.
Add as many as you like; there is no cap.
Use them for the questions your inbox already receives every week, phrased the way a customer would phrase them, not the way your website words them. An answer can include a link, which is often the fastest route to the page you actually want people on.
10. Capture leads
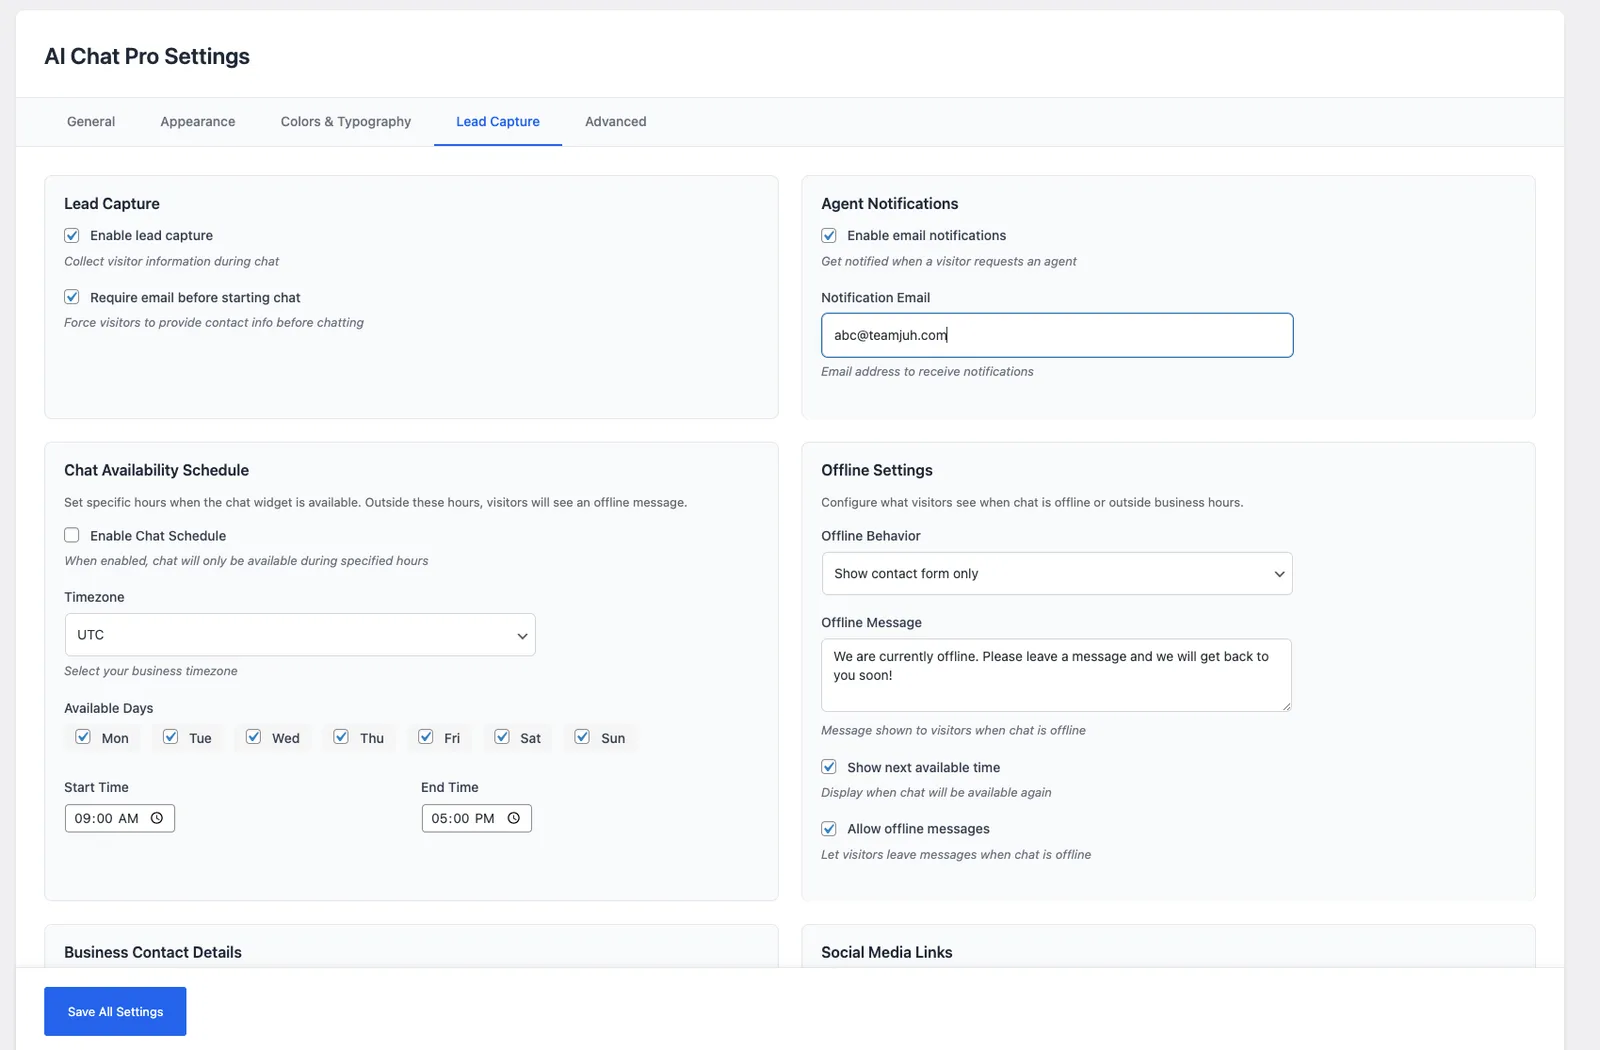
AI Chat > Settings > Lead Capture has two switches. Enable lead capture collects visitor details during the chat. Require email before starting chat makes contact details mandatory before the visitor can type anything.
Requiring details first gets you more rows and fewer conversations. Leaving it off, so the chatbot earns the details by being useful, is usually the better trade for a small business.
11. Hand over to a live agent
A request-an-agent button lets the visitor ask for a person. With Enable email notifications switched on under Agent Notifications, the address in Notification Email is told, the conversation is marked Pending agent, and an agent picks it up from the Live Chat dashboard with the full history in view.
Point the notification address at an inbox somebody actually watches during business hours. A handover nobody answers is worse than no handover button.
12. Schedule and offline behaviour
Chat Availability Schedule, on the Lead Capture tab, limits the widget to your real hours. Switch on Enable Chat Schedule, set the timezone, tick the days you are open and set a start and end time.
Offline Settings decides what happens outside those hours. Offline Behavior chooses what the visitor sees, Offline Message is the text they get, Show next available time tells them when you are back, and Allow offline messages lets them leave a message anyway.
Set this to the hours you genuinely reply in. A chat that promises availability it does not have costs you more than one that says it is closed.
13. Business contact details and social links
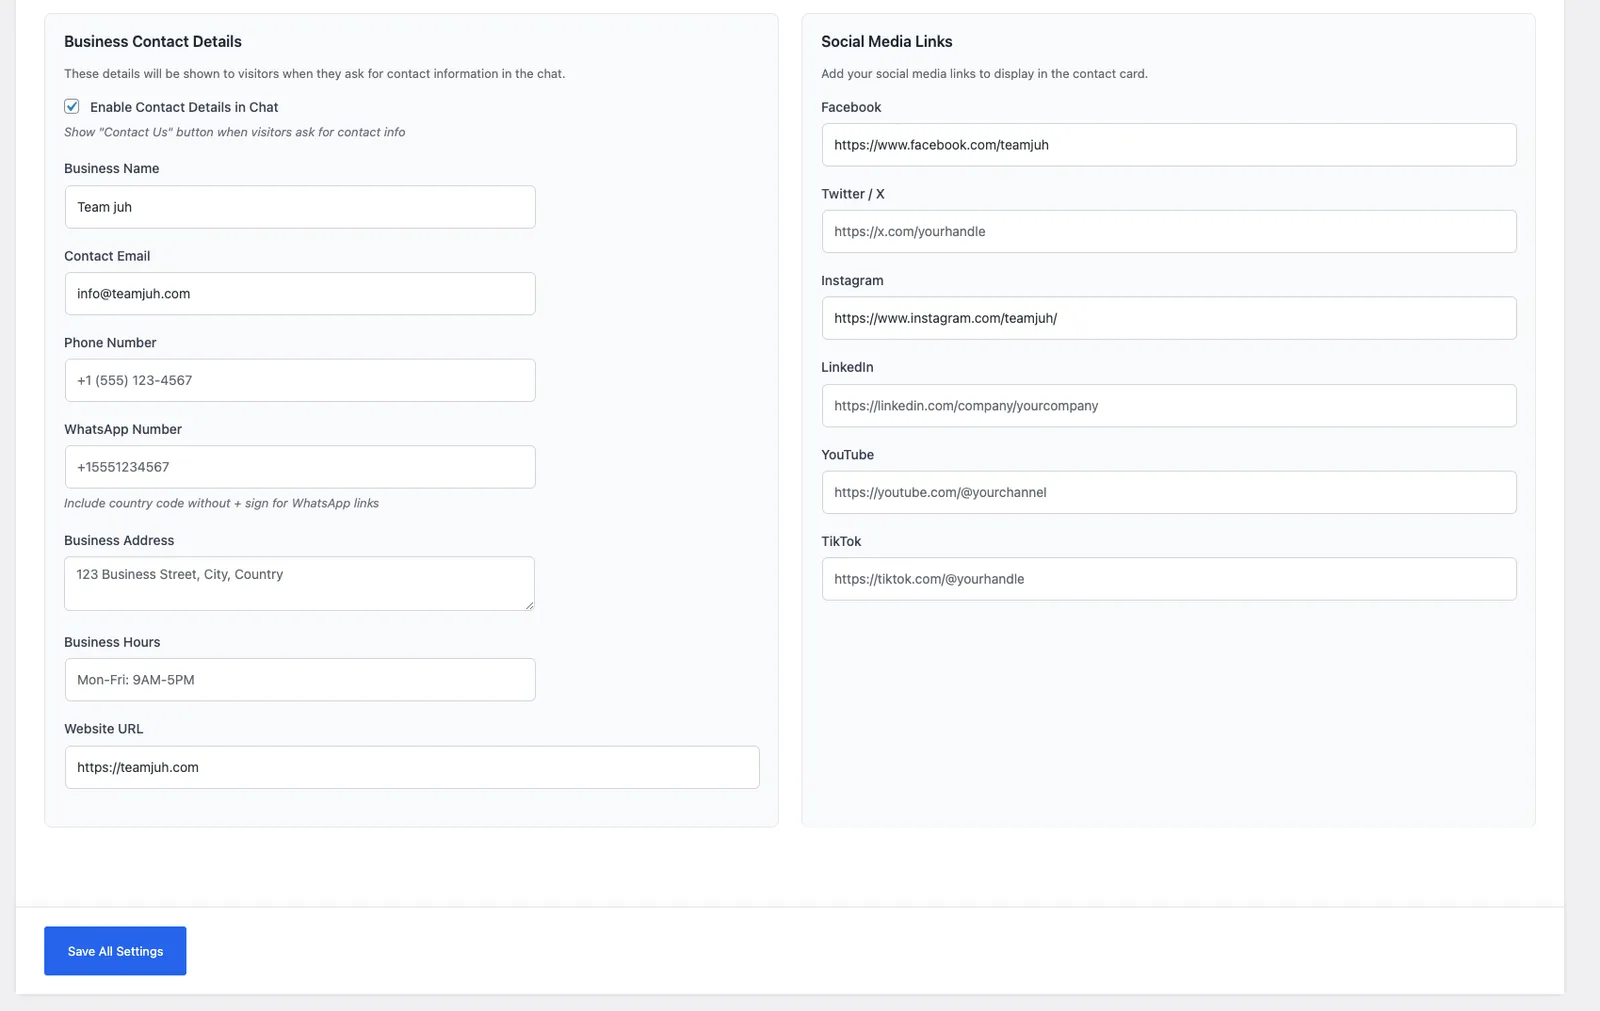
Further down the Lead Capture tab, Business Contact Details fills the contact card the chatbot shows when a visitor asks how to reach you: business name, email, phone, WhatsApp number, address, opening hours and website. Social Media Links adds Facebook, X, Instagram, LinkedIn, YouTube and TikTok to the same card.
Fill these in even if the details are on your contact page. It is the difference between the chatbot handing over a phone number and telling somebody to go and find one.
14. The AI notice bar
At the foot of the Appearance tab, Enable AI Notice Bar shows a line under the chat header telling visitors they are talking to AI, and Notice Text is what it says. Keep it on. It is honest, several jurisdictions are moving towards requiring it, and it lowers the chance of a visitor treating a generated answer as a binding quote.
15. Conversations and history
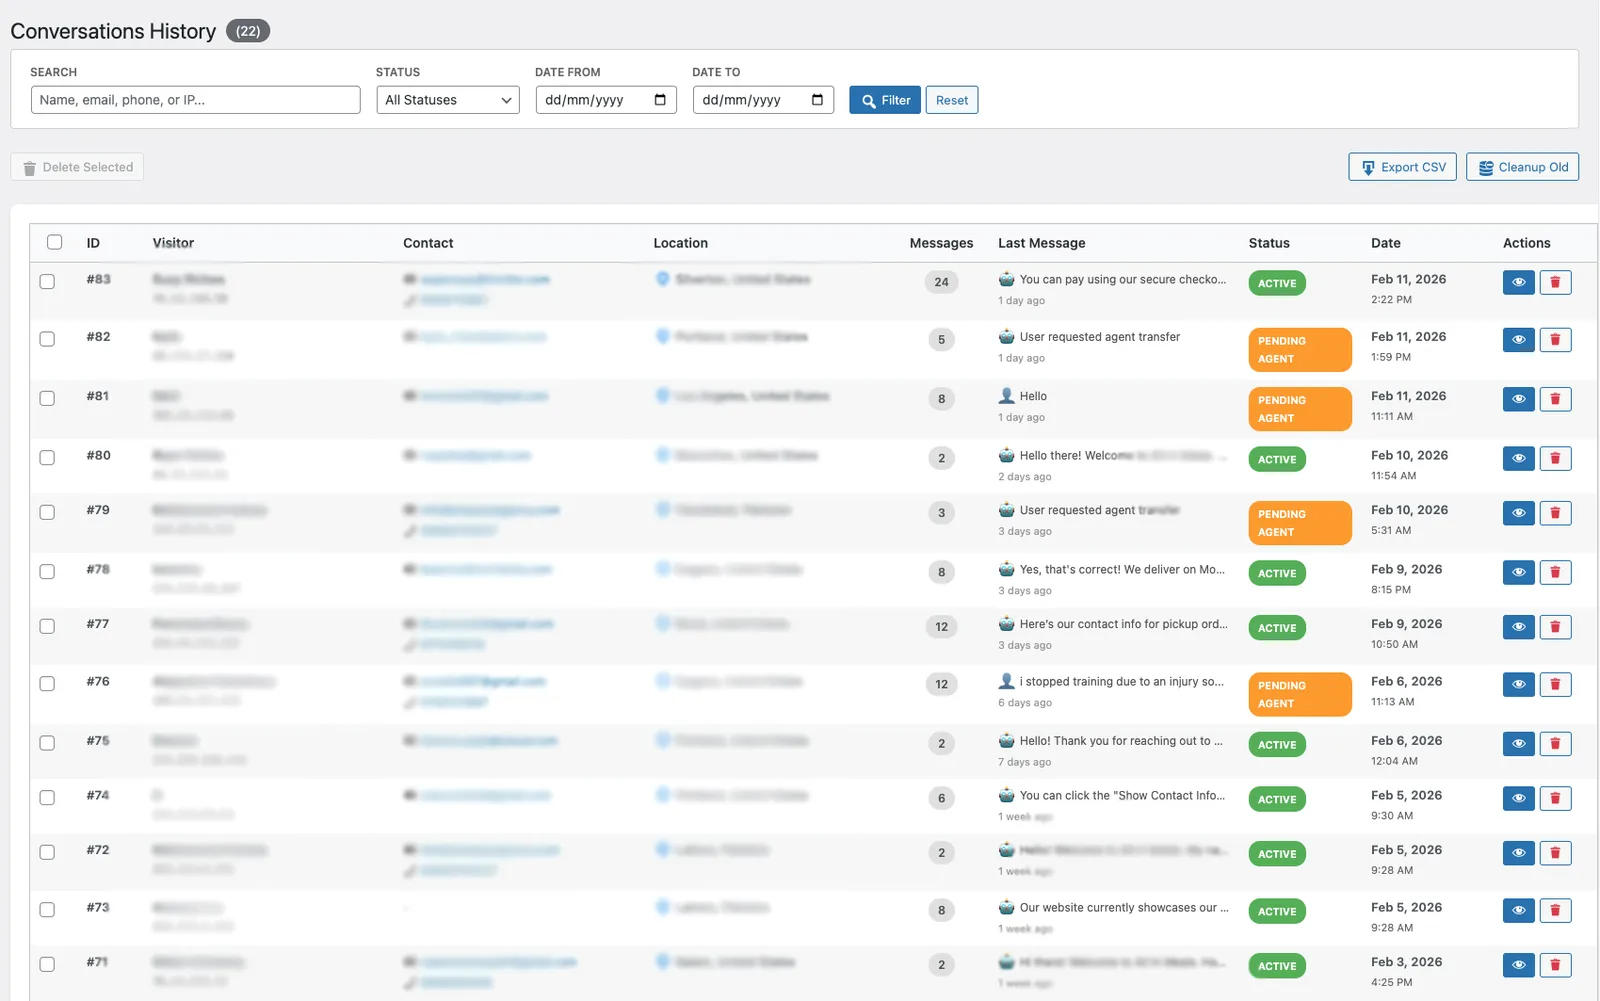
AI Chat > Conversations stores past chats with the visitor's contact details, their approximate location, the message count, the last message and a status. You can search by name, email, phone or IP, filter by status and date range, open any conversation, delete individually or in bulk, export to CSV and clean up old records in one go.
Read them weekly for the first month. The questions the chatbot answers badly are a list of pages your website is missing.
16. Privacy and GDPR
Conversations are stored in your own WordPress database, not on our servers. Messages are sent to whichever AI provider you configured in order to generate a reply. You can delete conversations one at a time, in bulk, or clear out old ones from the Conversations screen.
The plugin gives you the controls; the compliance obligation is yours, because on your site you are the data controller. Note that conversations record an approximate location and IP, so include the chatbot when you write your own privacy notice. The full detail is in the AI chatbot privacy policy, which you are free to link from your own site.
17. Troubleshooting
- The widget does not appear: confirm the plugin is active, that the current time is inside your chat schedule, and that a caching or optimisation plugin is not stripping the script. Clear every cache layer, including the host and CDN.
- Replies fail or time out: run Test API Connection on the General tab. The usual causes are an expired key, an account with no credit left, or a model your key cannot reach.
- A model is missing from the list: click Refresh Models. The list comes from your provider account, so a model you have not been granted access to will not appear.
- Answers are wrong or invented: narrow the selection under Advanced > Content Training and train again. An answer that is not supported by a trained page is a training problem, not a model problem.
- Handover emails do not arrive: check that Enable email notifications is on and the notification address is right, then look in spam. WordPress sends them with the site's mailer, so if the site cannot send mail at all, add an SMTP plugin.
- The chatbot will not share your phone number: switch on Enable Contact Details in Chat and fill in the business contact fields. It only offers details you have given it.
18. Get support
Ask in the WordPress.org support forum, where the answer helps the next person with the same problem, or email support@teamjuh.com. Include your WordPress version, PHP version, plugin version and the provider you are using, which answers the first three questions we would otherwise have to ask.
Frequently asked questions
Do I need my own API key?
Yes. The plugin connects to your own OpenAI or Anthropic account, and that provider bills you for usage. Both offer trial credit to start with.
Is any of it paid?
No. The plugin is free in full. Every AI model your API key can reach, unlimited FAQ buttons, unlimited conversation history and unlimited live chats are included. Your only cost is what your AI provider bills you for usage.
How much does the API cost to run?
It depends on the model and your traffic. Small models such as GPT-4o Mini and Claude Haiku cost a small fraction of the large ones and handle website questions well, which is what keeps a chatbot on a business site affordable.
Where do I train the chatbot on my content?
Under AI Chat > Settings > Advanced. Tick the posts, pages and custom post types it should answer from, then click Train AI on Selected Content. Run it again whenever you publish something it should know about.
Will it work with my theme?
Yes. The widget is injected on the front end and styled independently of the theme, with theme, colour, position and per-element styling controls if it needs adjusting.
Where are conversations stored?
In your own WordPress database. Messages are sent to your chosen AI provider to generate replies, and you can delete conversations individually, in bulk, or by clearing out old ones.
Can I use it on several sites?
Yes, on as many as you like. Each site needs its own installation and its own API key, because the key belongs to your provider account rather than to the plugin.